Today’s article was written by guest blogger R. J. Sagely
 Bob has been interested in Old Californio/vaquero/buckaroo styles of horsemanship and its attendant gear for many years and has a business called Sage Saddlery.
A LITTLE BACKGROUND
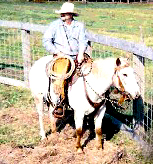
Although the hobble is a tool that dates back centuries and was used in horse cultures around the world, it is not commonly in use by today’s more recreationally oriented horse owners. It has most definitely not outlived its usefulness in modern times. The application can vary from an outright form of restraining a horse (make no mistake, it is an effective and powerful mechanical device) to a tool to teach a horse to ground tie or to stand when tangled in wire until help arrives. Not having to live with the horse and rely on it for transportation and needing it to be roughly where you left it (which may have been miles from anywhere in times gone by), many horses and horse owners of today have never used, or even seen, hobbles. So here is a little primer on the historical use, types and applications of some of the common “western” style hobbles. The basic training steps to acclimate a horse to hobbles will also be related with the caution up front that these procedures are opinions of the author on how and what to do and are not warranted to any degree of success on your part if attempted. Hobbling and training a horse to hobble can result in injury or death of the horse or person involved. Try these at your own risk, they work when I use them.
The hobbles I’m referring to here are similar to a pair of handcuffs that are placed, wrapped, tied or buckled around the pasterns or cannon bones of the front legs of a horse. They come in many styles and pack a host of different names: vaquero, braided, twisted, burlap, figure eight, chain or chain link. All commonly are applied to the front legs. Rope restraints applied to the hind legs are often referred to as leg ropes or sidelines but you will find an occasional reference to a hind leg hobble. This is about front leg hobbles.
A LITTLE HISTORY
The historical use of hobbles with a trained or “broke” horse was, and remains, primarily to slow him from wandering too far, too quickly. These devices cannot generally keep a horse in one place. In fact, I have chased horses a mile or more on a couple of occasions. Not a classic lope (more of a three legged, rambling stumble at speed) but they can motor down the trail quite well and fast enough to leave me out of breath were I to try and match the pace. Keep that in mind if you ever use them and are a long way from the home place.
Hobbles were also used in the rough and tumble manner of “bronco busting” in the days of the early and wild West of the United States, mainly a Texas style of horse breaking. They were used, in combination with sidelines, to keep a horse down while a rope halter or hackamore rig was slipped on his head for the first time or to hold him relatively in one place, with one or two neck ropes and a sideline to boot, as a saddle was cinched up for the initial ride. The hobbles were usually gotten on after the horse had been “busted” or thrown with a “flyin’ W”. This is where the broncman catches both front feet with a catch rope, or lasso, as the horse races by and then sits back on the rope and sends the horse tail over teakettle onto the ground. Another fellow would sit on the horse’s head (maybe with an ear between his teeth) while a third tied a hobble on the forelegs. This hobble was often made of a length of burlap sack that went around a leg, was twisted several times in between and then tied around the other leg. Sometimes just a short length of rope was used which would burn the hide as the bronc fought to free himself. Horses were cheap then and many were needed on a ranch. Much time could not be spent on gentling so the bronco buster did not worry much about the loss of hide or hair or even life or limb (of the horse, of course). With today’s horses being a little more valuable, time and care can be used to introduce the hobbles a little less traumatically than this old way. With sufficient prior and proper preparation, to borrow a phrase from a renowned horseman, little struggle or panic should result when hobbling a horse for the first time. No guarantees, these are horses after all. But a little, well, let’s be honest, a lot of patience and time will pay huge dividends in the end.
THREE COMMON “USING” TYPES OF WESTERN HOBBLES
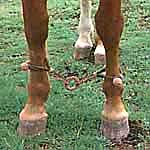
 The vaquero or braided hobble is made from four, eight or sixteen strands of narrow rawhide, leather, latigo or nylon parachute cord strings braided into a length. This length is then doubled, the ends of which are tied together forming a large button on the joined ends. This is typically covered with a fancy braided knot, such as the pineapple or lone star knot. Two of these doubled lengths form the cuffs by passing each through a central ring (or two), secured and adjusted by Spanish ring knots which slide over the cuffs and hold them on the leg. The rings are often covered by a single rawhide string hitched in a coxcomb or other fancy pattern.
These hobbles usually hang from the saddle by a ring tied to the rig so that they are ready to use when out on the range and fencing (or a quick nap) is needed to be done by the buckaroo. These are not for training purposes as they are often lighter and somewhat thinner than other styles. They are highly decorative and I have been braiding this style from nylon “parachute” cord for years. These last a long time and I have not had a horse injured wearing them (though one horse did tear a pair apart, which is a good thing and why I usually make them with a single ring rather than two). The pair pictured are about five years old.
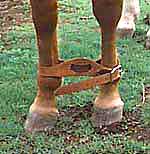
 The figure eight hobble is a classic Texas style hobble found in most modern saddle shops. These are made of two layers of leather, the outside being saddle skirt (a heavy leather) and the inside (against the horse’s leg) being latigo. The latigo is somewhat easier on the hair of the leg. The hobble itself is a single piece that goes around one leg, through two slits in the strap in between the legs and around the other front leg. It is a buckle hobble which can make its release a little tricky if the horse spooks and goes down with these on. As you might imagine, these are not training hobbles either (we’ll get there, be patient).
Again, these are easily packed when riding as they can hang from a ring on the forks or the cantle of a western saddle. They are stout and will not give unless purposefully made from a lighter leather strap. I have a pair and prefer the vaquero style for most riding that I do. The figure eight is kept in my rig and I use it when tying a horse for shoeing is not possible (that is a whole other article). The adjustment on these is not very refined and I find that they can slip around the leg quite a bit. Also, if you try and use these on the cannon they always seem to slide down around the pasterns. At least, that has been my experience.
The twist hobble is versatile and can be made in a number of ways, depending on the material available and the use to which it will be put. A rawhide version is the historical bronc hobble because rawhide was a very abundant and cheap, easily prepared material on a ranch (some old cow was always dying to provide more material). The rawhide version is a very stout hobble but somewhat cumbersome and definitely not easily packed for riding.
Another version is simply a three strand, heavy cotton rope that has been untwisted and then braided back into about a three foot length. This is a pretty good for hobble training purposes as it can easily be released, it is tied with a simple shoe string bow, and the cotton limits injuries if things do not go well the first time. A length of old burlap will serve a similar purpose. The cotton rope can serve double duty to tie wild cattle down when such a need arises (not too often nowadays). The rope is just looped around a leg, twisted a few times in between and then tied around the other leg like you would tie your shoe. The number of twists determines the amount of movement you will allow the horse. More twists, more movement. This version of the twist hobble is very easily packed along for riding by running it doubled up through the gullet of a western saddle or hanging from a saddle ring or your own belt.
SO HOW DO YOU DO THAT HOBBLE THING?
Hobbling a horse is a significantly stressful event for all concerned if you simply slip on the cuffs and leave the horse to his own resources. The less time you have spent building his confidence in humans and their contraptions, the bigger the wreck you may incur. So the first rule of hobble training is to prepare the horse with plenty of groundwork and trust building. Once you have reached a point in your relationship with the horse where he wants to be with you and looks to you for relief when things get tough you can proceed with some simple exercises that will build to finally putting a pair of hobbles on.
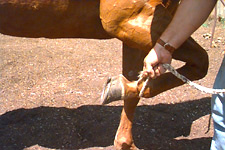
 The first actual hobble related thing I do is get the horse acclimated to the feel of a piece of rope on his pastern and cannon. With the lead rope draped over my arm, I will ask the horse to lift his leg and then support the cannon bone with one hand. I then use the hobble rope doubled over to cradle and hold the leg. If the horse resists too much I just let one end go and the foot is free. After some relaxed success with both the front and hind legs, over a series of a few days, I move on to the next phase.
The second thing I do with the cotton hobble is try to lift the leg forward using the doubled rope. I slip the rope around the pastern or cannon and hold both ends in one hand, the other hand ready to control the lead rope if needed. I will slowly and lightly pull the hobble rope toward me. If the horse takes a willing step, I release pressure immediately. If not, I wait and give him time to move. If he tries to step back I will move with him but keep the forward pressure steady. I won’t tighten up with more pressure as I am not trying to stop him and I do not want to start a fight. I do want him to keep a level head and think through my request. To do this on the hind end I will ask for a step out to the side by pulling ninety degrees to his backbone with the rope on a hind foot. The hobble should be made long enough so that when doubled there is room to do these exercises but still have a safe zone between you and the horse. When the horse has reached a relaxed and comfortable response to the hobble rope pressure on his legs you can move on to another set of exercises.
The next phase of training involves the use of a 5/16″ or 3/8″ diameter 60′ soft lay poly catch rope with a very free running metal or rawhide honda ( No, not a car!). This is a loop on the end of a lasso that helps form the part that slips over what you want to catch. I use this to begin teaching the horse about trapped legs. Some ability with a long catch rope is required for this method, not in throwing it and catching things, just in handling a long line. I do this in a round pen with at least a 40′ diameter but any enclosure with safe fencing and soft ground will serve. (No rocks or other obstacles in the pen, please.) Because I have spent the time it takes to get here, the horse is at liberty (No halter on) and at ease, standing next to me. I ask him to lift his front leg and slip the noose of the rope over the pastern and step back, feeding out some slack. If he will not readily lift his leg for me, he is not ready for this stage of hobble training. After the rope is on his leg, if he moves, I let him. If he stands, I let him. I can gauge some of my progress in other training areas by the reaction I get about now. If he is spooked by the rope, I may have begun hobble training too soon and I need to back up for awhile longer and build more trust. This is an individual thing, each horse takes different experiences and processes them uniquely (Very self-centered animals in some ways.).
When it is readily apparent that the horse is OK with the rope on his pastern, I will apply a light pull to the rope and see what I get. Up until he is ready for a bit of intentional pull it is necessary to keep the right amount of tension in the rope so that it will stay on his leg but not so much that he will fight or panic. If the rope does come off before he is able to accept its presence and relax, you can do a few other liberty exercises and then try again. Good horse sense is applied all along the way. Remember to use these steps as guidelines and not get too entrenched in the procedure that you lose sight of what you are after – a relaxed and thinking horse who will listen to you.
If the horse backs up, I feed him slack. If he runs forward I feed him slack and try to bring him down with a relaxed body language that says it is all right, things are not necessarily as scary as they seem and you can stop. What I do not do is try to stop him by pulling the rope. Be aware that a horse can wrap himself up in the rope and catch ropes can cause abrasions and “rope” burns to the pasterns and legs. If you do not get in a tug of war with the horse this will not likely happen. Wrapping himself up can be a good thing but only if you have his trust and he is not in a panic or a fight with you. He will look for you to unwrap him if he thinks he is in trouble and you have his trust. After a bit I will do the same for the other front leg. Short, positive session are the key to success without battles. I will eventually work the hind legs also as wire fencing that is down on the ground can wrap a horse up at both ends.
Eventually I will set it up so that the horse will step over the rope with his free leg and then I will apply a little pull and he will be in a semi-sorta-hobble that I can let go of easily. Again this is a judgment call, you do it when the horse is ready. I made mistakes in my early attempts by trying to do something before the horse was ready. There is no ironclad way to tell another person when a horse is ready for the hobbles, only the horse can do that. The level of your skill is directly related to how often you judged correctly that the time was right.
When the time is right, I will tie the hobble to the horse’s front legs as described for the twist hobble. I prefer around the cannon bones for the training period and I cannot point out a real specific reason why, I just do. The horse seems to accept this better while he is still in this phase of early exposure. Now if all has been prepared properly for this momentous occasion it will be a definite anti-climactic event. The horse will stand there. You will stand there and after awhile you will take them off because you want to go for a ride. Your next big challenge will be to hobble him out in the green grass and watch him do the three-legged boogie as he tries to get to the greener grass on the other side of the field or follow a bunch of horses that just rode by. Or maybe, he’ll just stand there and enjoy the view.
SAFETY CONSIDERATIONS AND DISCLAIMERS (AGAIN)
This is a restraint and some horses will panic no matter how much preparation you endeavor to make. Be sure to do this in an area that is confined but with room for you and the horse to stay out of each others way if things go wrong. Have a sharp knife on you in case you have to cut the hobbles off (Another reason for using the rope, it’s cheap!). Do not tie a horse by the lead when hobbled, especially for training to hobble. Do not cross tie or in any other way restrain the horse, the hobbles are enough for the horse to be dealing with mentally and physically. Never leave the horse with a halter or headstall on while hobbled, even after they are “trained”. Remove this gear as trailing leads and reins can cause injury to the neck and back if the horse does the three legged run and comes down on one. Never leave the hobbled horse unattended for extensive periods of time, they can always find a way to get into a jackpot. Never hobble a horse inside a horse trailer, stall or other confined space. This “how to” is not warranted to be the only way to train a horse to hobble nor is it warranted to be successful. Horse training is an individualized activity and has inherent risk to the activity. Use these exercises at your own risk.
Copyrighted © 1999 by R. J. Sagely. The reprinting or distribution of the whole or any part without express permission of the author is prohibited.
 You can get more information about this and other topics at his website by clicking HERE.
